

")
This Christmas I decided to show my appreciation to all at R’s office for the utmost support when I decided to launch my food blog 2 months back. It has been quite the success so far, though not without its challenges. The biggest challenge I face every week is making something that :-
a) Can be transported safely from my home to the office in one piece. I do not drive so whatever I take with me needs to survive the bus trip or in the basket of my bicycle.
b) Can be served at room temperature and still retain its flavour, texture and integrity.
c) Can be eaten during the office meeting without the need for utensils or plates. So no puddings or trifles.
Then it hit me … meringue kisses! Yeah. I have always wanted to work with meringues because they seemed so easy, yet I was always afraid of them. They have always conjured up images of super delicate white fluff that threaten to collapse on you at a moment’s notice ~ just breathe over then and they might throw a hissy fit and fall apart, leaving you to feel like a miserable failure. The initial plan was to actually make a chocolate truffle tower, but I did not think they would survive the bus ride into the city considering they are much heavier than meringues.
R has always loved meringues and in the shops they are so frightfully expensive. I’m like, “… but they just consist of egg whites and powdered sugar!!” One of the reasons R bought me a stand mixer was because I said I could make all the meringues in the world (that and chocolate mousse), if only I had a stand mixer. Now that I have one I suppose I am all out of excuses. R however has been a brilliant supporter of my cause, bless him. My kitchen is kitted out with most of the essential tools and equipment one needs to bake effectively, and it’s all thanks to him. I did not quite get the KitchenAid I have been eyeing for so long, but oh well. I still make pretty decent cakes and cookies from my Bosch model.
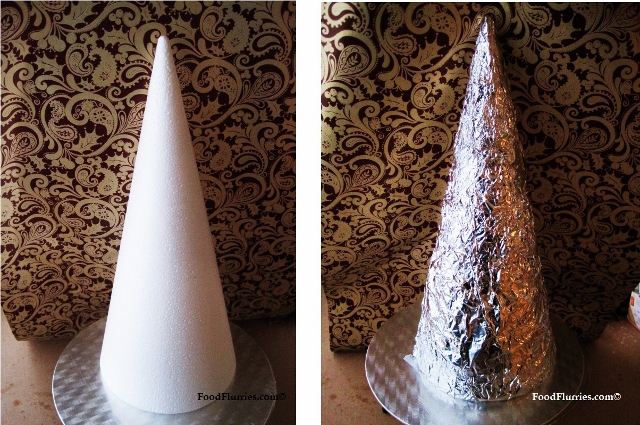
Back to the meringues … after deciding on the meringues I went one step further and decided on presenting them as a tower. I have always loved the profiterole towers and croquembouches in Italian bakeries. Such elegance. Such class. So off I went to the hobby store and got me a 22cm tall Styrofoam cone. Wrapped that in foil and stuck it to a circular cake board with royal icing. For extra hold you might want to discreetly place clear sticky tape here and there where bits of foil stick out. The cone will need a few days to dry solid so this project needs some thought and planning ahead of time. Even the meringues need time to dry, so I would suggest you prepare the meringues up to 2 days in advance.

My first ever batch : Not white, and had many cracks. This is the colour you will achieve if you use regular vanilla extract and if your oven temp is over 100 degrees.
Making the actual meringues is pretty much childs’ play. If you have eggs in the house along with powdered sugar and vanilla extract, then you can whip up meringues anyday.
The Recipe: (**note: This is a single recipe. To make the meringue tower I had to use this recipe 3x in three batches.)
- 2 egg whites
- 120 g powdered sugar
- 1 tsp clear vanilla extract
Before you embark on your meringue fantasy, here are some principles you might need to know. I only wished I knew about this before I started.
a) The egg whites need to be at room temperature otherwise they WILL NOT FLUFF UP.
b) The mixing bowl you use should be spotlessly clean.
c) Low temps + long baking time = white meringues with no cracks.
d) Using a clear vanilla extract will keep the meringues bright white.
Now armed with this knowledge, we are now ready to begin.
- Crack eggs and separate whites from yolks. You can use the yolks later to make custard or a nice cabonara sauce.
- Place the whites in a clean mixing bowl. Even the slightest smear of grease or oil will be detrimental to the success of your meringues. If you are separating the eggs using your bare hands then make sure your hands are spotlessly clean and grease free as well.
- Sift the powdered sugar and make sure there are no obvious lumps.
- Turn on your machine, fitted with a balloon whisk, to medium speed. Wait for the egg whites to fluff up and turn from clear to opaque. Beat about 4 minutes until soft peaks form.
- Now you can add in the sugar a tablespoon at a time, all the while whisking air into the mixture. Keep speed on low or medium to avoid all that sugar coming back up and in your face.
- As you keep whisking the mixture will thicken and look like a fluffy white cloud. You can add your vanilla extract at this point. If vanilla is not your thing then feel free to put in peppermint extract instead. For my first batch I crushed some peppermint candy canes and sprinkled them onto uncooked meringue before putting them into the oven.
- Now comes the fun part ~ piping. Fill a disposable piping bag fitted with a large star tip nozzle. Line 2 cookie sheets with parchment paper. You may need to stick the paper to the tray with a dab of meringue on all four corners. Now pipe the meringues out by holding the bag at a 90° angle. Place the nozzle close to the paper surface, squeeze the bag until you reach the desired size then stop squeezing and lift the nozzle straight up. The longer you squeeze the bag the bigger the meringue kiss will be.
- Leave the tray aside for about 30 mins to dry them out a bit. Then put them into the oven at about 85°C and bake for 3 hours. Yes, you heard me ~ 3 HOURS!

I have been baking meringues for the past 2 days because the first batch wasn’t a huge success, so you can imagine the length of time my oven has been running. I put in three trays yesterday and I had to set an alarm for 5 a.m just to turn the oven off for the final batch. Now I finally have enough to cover the cone with. Once baked leave the meringues in the oven with the heat off to cool down gradually, say about 1 hour.
Embellish your meringues as you see fit. I put on silver cachous because I am going for “Christmas Festive”. Put edible sparkles or dip the bottoms in melted chocolate. The most difficult part for me was the baking. Getting the timing right has been a big challenge, along with maintaining the colour (or lack there of). The target was to achieve as white a meringue as possible, however as I have baked over six batches they all seem to vary in “whiteness” and this annoys me. Some are more ivory than white and I don’t know where I went wrong. Baking times have varied wildly as well. Again, the target was to achieve a crispy, chrunchie meringue with a dry texture throughout from skin to centre. But here again the results have been less than consistent … I don’t know if it’s the humidity or the temperature differences on the days I made them. One tray required me to leave them in the oven for close to 4 hours before they were totally baked through and crispy. The good thing about doing tray after tray is that it has been excellent practice. I now know that if the temp is low enough you can put silver cachous on the unbaked meringues and they will not explode into sugary oblivion once in the oven for over 3 hours. Sprinkling the tops with crushed peppermint candy is also a good idea as it gives the meringue another dimension of texture and flavour.
In order to construct the tower, you will need to get a Styrofoam craft cone from an art supply store and cover it with good quality kitchen foil. Place the shinny side up and make sure there are no holes in the sheet. You will need more than one sheet to cover the cone, depending of course on how tall yours is. Stick the foil down with clear cellotape and place the cone onto a large cake board.
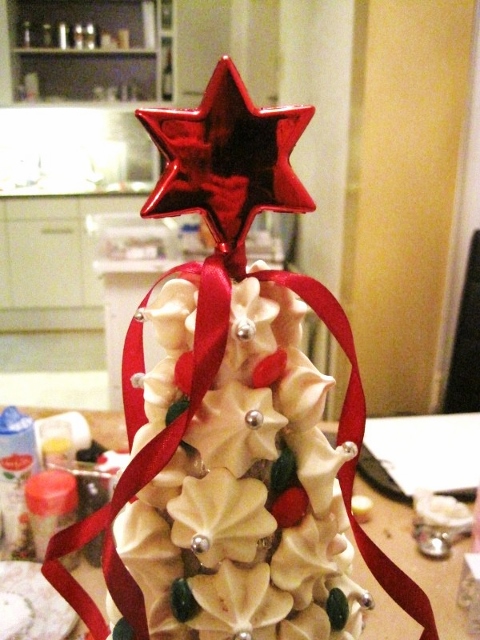
Stick the cone to the cake board by smearing some meringue underneath and leave it to dry for a while. Now begin sticking on the meringue kisses one at a time, starting with the biggest ones first. Try to stick them on (using more meringue as glue) as close together as you can, and in neat rows. How you stack your kisses will affect the overall look of your finished product.
Once the meringue kisses are done, fill in the gaps with red and green milk chocolate M&Ms. It took me about 2 hours to finish the entire tower. I got a Christmas ornament star on a bamboo stick from the local florist and placed that at the very top of my tower. To finish off the look, I placed cascading wine-coloured satin ribbons on top as well.
So have a go and see what you come up with. Remember, the more you play around with piping the better and the more comfortable you will feel while manipulating a piping bag. Working with marshmallowy meringue can be messy so have a damp cloth nearby at all times.
~ ENJOY ~

14 comments
Skip to comment form ↓
chris
December 13, 2011 at 2:47 pm (UTC 1) Link to this comment
Dang! Viv! thats amazing!!!!
Natalie
December 13, 2011 at 2:48 pm (UTC 1) Link to this comment
Viv you are amazing. Fantastically amazingly awesome. Every time I see this in the kitchen I drool. Thank you for letting us be your taste-testing guinea-pigs this last few months! (I’m not sure how long you’ve been providing the office with your cooking marvels, but I’ve only been here for a few months)
x
bubviv
September 3, 2012 at 10:47 am (UTC 1) Link to this comment
I can’t wait for Christmas this year. I wonder what I’ll make this time? Perhaps the Christmas log cake can be an AbbyWinters office tradition.
Liliana
December 13, 2011 at 3:13 pm (UTC 1) Link to this comment
Viv, I am speechless most beautiful xmas cake ever!! can’t wait to eat it.. Great to see you friday night too!
Christina
December 14, 2011 at 4:36 pm (UTC 1) Link to this comment
Just tried my first meringue with a nice pot of tea and could not stop at one or three for that matter. Delicious! Thanks for my box of treats 🙂
bubviv
December 14, 2011 at 8:11 pm (UTC 1) Link to this comment
You are very welcome. I hear you intend on embarking on your own meringue adventure soon. All the best Christina.
Dionne
December 20, 2011 at 6:01 am (UTC 1) Link to this comment
Okay am gonna try this out during the holidays! Wish me luck!
bubviv
September 3, 2012 at 10:48 am (UTC 1) Link to this comment
LUUUUCCKKKK!!! :))
Alana
September 15, 2018 at 3:33 am (UTC 1) Link to this comment
Hello there! I came across this recipe and i am suprised! Coz they retained their consistency and texture. I live in California, and when you said to leave the meringues to dry for 30 minutes, what kind of weather were you having? Also , did you meringue become sticky after? And how long did it last for display? I would appreciate if you can shine some light into my questions. Thank you so much!
bubviv
October 15, 2018 at 12:23 am (UTC 1) Link to this comment
I made these around December. Amsterdam gets a lot of moisture coz it rains all the time but if you bake the meringues low and slow they will be dry enough to last. They were on display for the entire day with no problems. For storage I kept them in an air-tight container lined with parchment paper.
Stacey Stewart
February 9, 2019 at 10:01 pm (UTC 1) Link to this comment
How long can the tower sit out before it starts to go bad?
bubviv
October 13, 2019 at 12:21 am (UTC 1) Link to this comment
Once it is baked and set the meringues will sit out for a good few days. I’d say up to 3 days.
Helen
November 29, 2019 at 10:22 pm (UTC 1) Link to this comment
Thankyou for this recipe.. it looks amazing and I’m keen to try it.. a question though.. to assemble the cooked meringues to the cone, do you use uncooked meringue, is that right? Have some pregnant ladies at work and they can’t eat uncooked egg and I’m thinking cream may not have enough strength? Thankyou in advance
bubviv
November 30, 2019 at 11:22 pm (UTC 1) Link to this comment
I would advise against using cream to stick the meringues to the cone as the cream is not sticky. Cream has fat and will be slippery. Also, the meringues will absorb some of the moisture from the cream and become soggy on the bottom. Use caramel if you must avoid uncooked egg whites or even nutella spread. YUM!